Documentation Index
Fetch the complete documentation index at: https://domoinc-arun-raj-connectors-domo-479583-raisers-edge-connec.mintlify.app/llms.txt
Use this file to discover all available pages before exploring further.
Intro
Cloud Amplifier enables you to connect Domo directly to your Snowflake data—without requiring data movement. Your data remains governed and secure in Snowflake, while Domo provides you with powerful tools to explore, transform, and visualize it. This guide walks you through setting up the integration, including read/write access and OAuth configuration.Architectural Overview
This image represents the integration between Cloud Amplifier and Snowflake.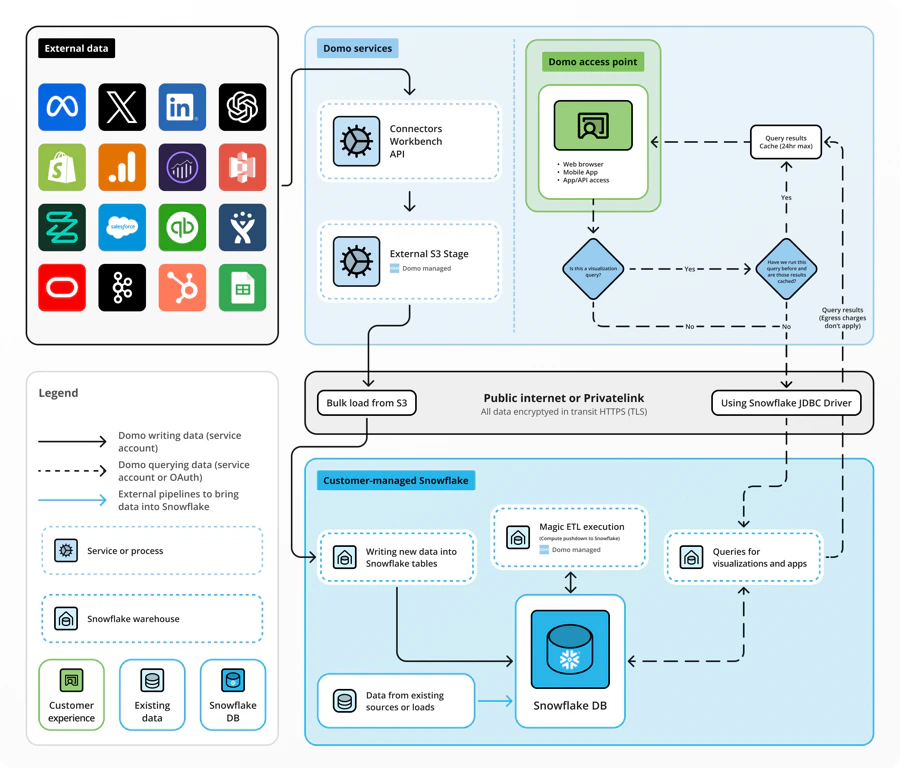
Prerequisites
Cloud Amplifier setup consists of two parts: Read-only or Read/Write. After the Read-only setup is complete, you may begin using virtual tables that read from Snowflake to create cards, set up Alerts, or serve as inputs in Magic ETL flows. You can set up read-only and return later to set up the Write portion. Before setting up the Snowflake connection, we strongly recommend that you complete the following:- Create a Snowflake service account — We recommend creating a new Snowflake account specifically for this integration. You can use any account with read access in Snowflake, but a service account is best practice. This account must have read access to your default Snowflake environment in order to create virtual Snowflake tables in Domo.
- (Recommended) Create a Domo service account — We recommend creating a new Domo account specifically for this integration. The account role must have the Manage Cloud Accounts and Manage DataSet grants enabled.
Account Creation — Write
Before registering with Cloud Amplifier for the Write portion of the setup, you must complete the following:- (Required) Create a default Snowflake database — You need a Snowflake database that is exclusively for Domo to write Domo-managed tables. During setup, this database is the default.
- (Conditional) Place IP Addresses on an allowlist — If your Snowflake environment restricts access based on IP address, you may need to place Domo IPs on an allowlist.
Create or Manage your Snowflake Integrations
To access the integration management interface, please follow these steps:- Navigate to the “Data Warehouse”
- Select “Connect Data”
- Choose “Snowflake” from the list of Cloud Integrations.
- The Domo on Snowflake page appears. Selecting Connect Snowflake initiates the process to create a new integration (refer to Integration Setup instructions on this page), while choosing Manage Integrations allows for modifications to existing integrations.
- A list of available integrations will be displayed. By clicking the wrench icon, you will see different options based on your access level.

Create a Snowflake Integration
- Name your integration
Choose a label to identify this Snowflake integration in Domo. It doesn’t need to match anything in Snowflake and can be changed later. - Add a description (optional)
Helps others understand the purpose of the integration. This is only visible in the integration details. - Select or create a Snowflake service account
Choose an existing account or click “Add account” to create a new one. This account authenticates to Snowflake and determines access to tables.
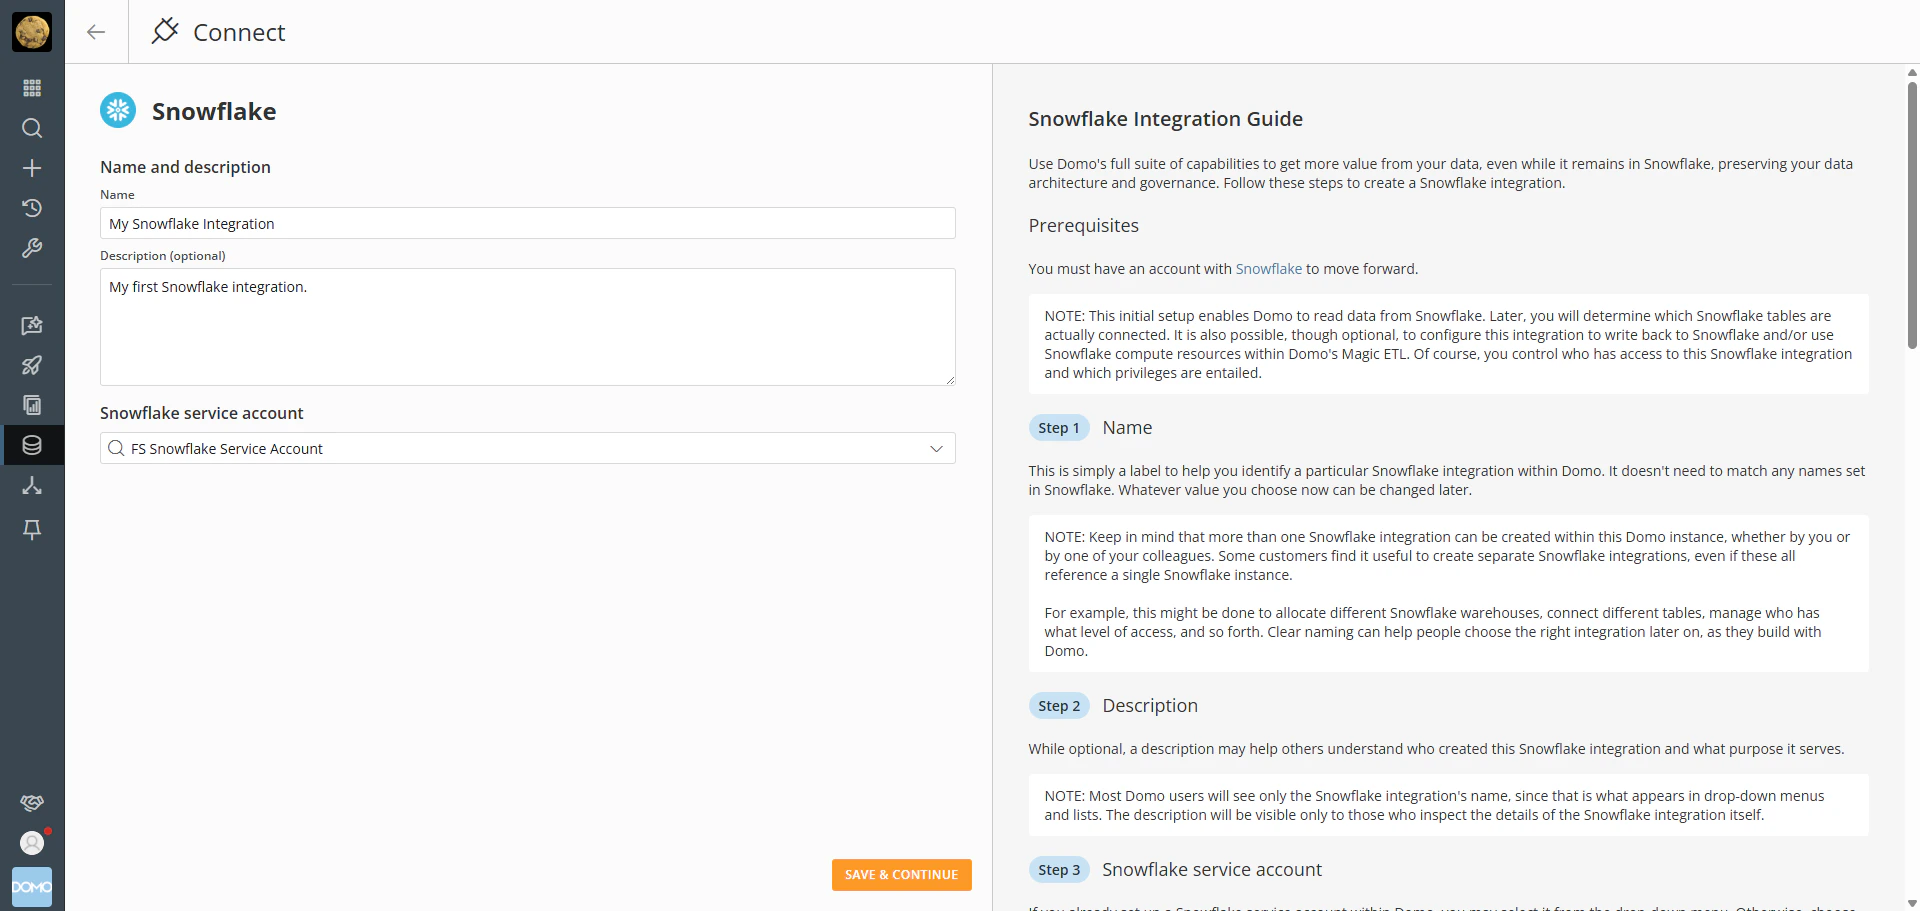
- Choose a Snowflake warehouse
Select the warehouse to use for querying data. You can assign multiple warehouses later for optimization or specific use cases.
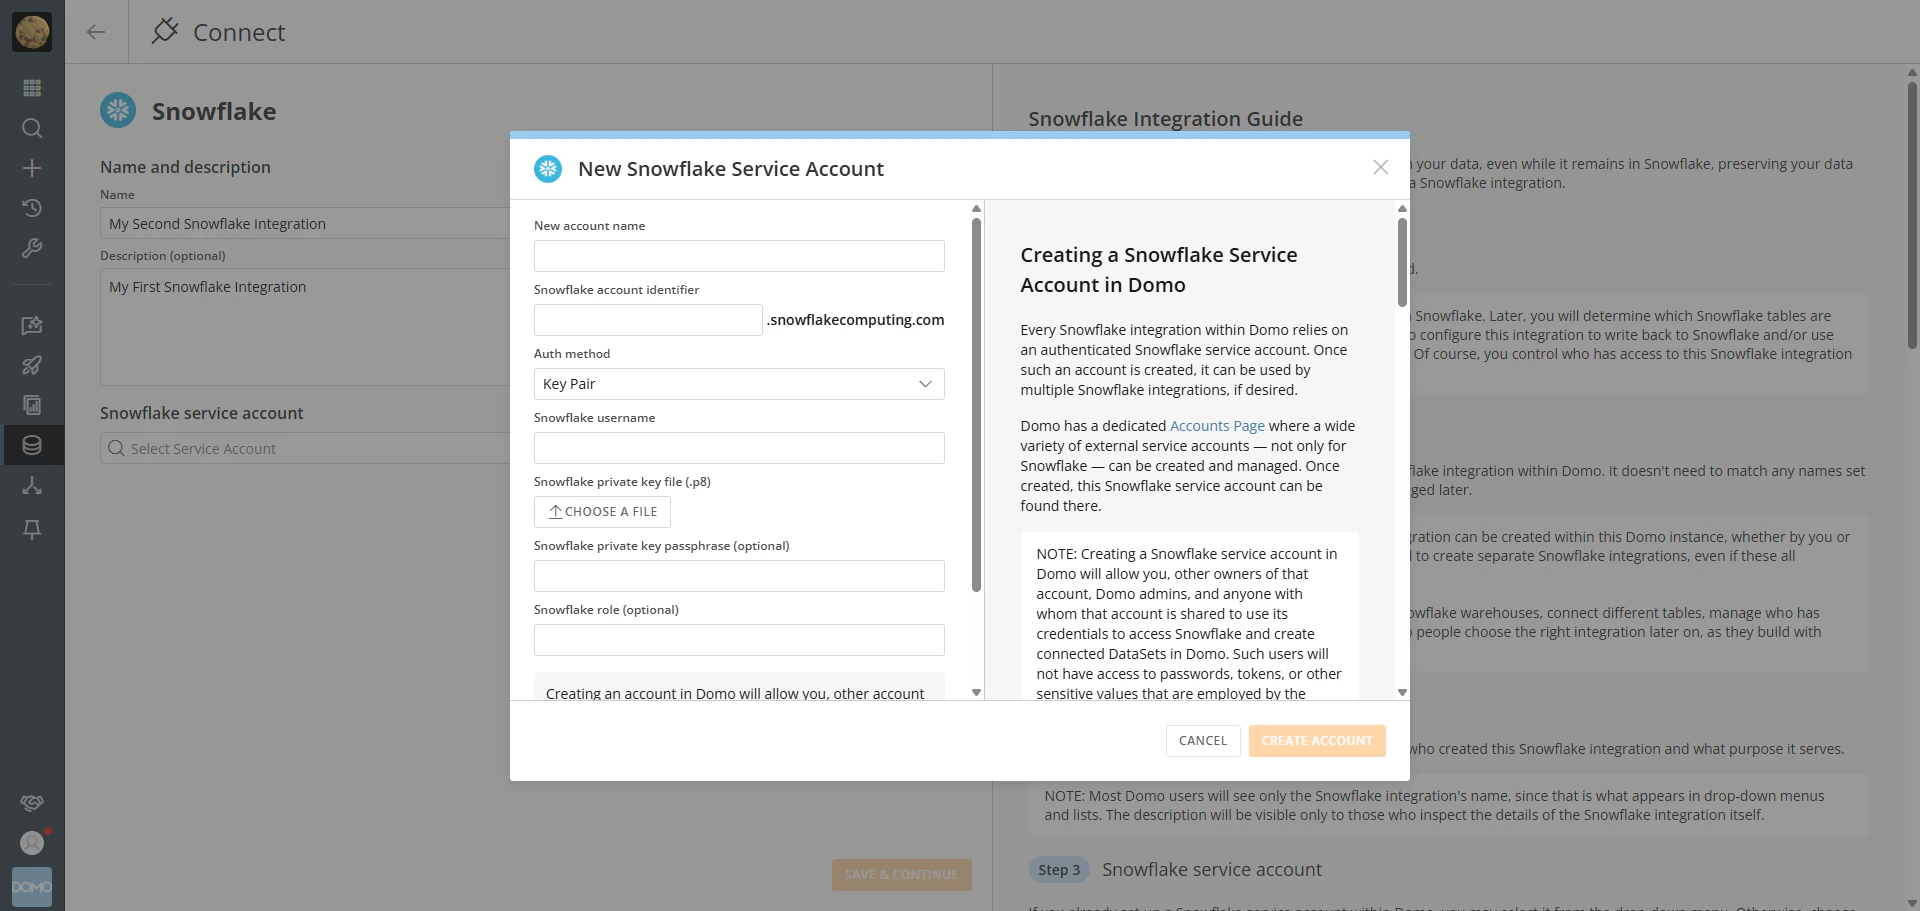
Create a Snowflake Account
Every Snowflake integration in Domo relies on an authenticated Snowflake service account. Once created, a single service account can be reused across multiple integrations. To create a Snowflake service account in Domo:- Name the Account
Choose a name to identify the Snowflake service account within Domo. This name can be changed later.
- Enter the Snowflake Account Identifier
This is typically a subdomain of snowflakecomputing.com. You can find it in Snowflake under Account > View Account Details. Refer to https://docs.snowflake.com/en/user-guide/admin-account-identifier for help. - Choose an Authentication Method
Select one of the following:-
Add the public key to your Snowflake user:
ALTER USER "<username>" SET RSA_PUBLIC_KEY='<public_key>'
Replace <username> and <public_key> with your actual values.
-
Add the public key to your Snowflake user:
-
Key Pair (Recommended)
Snowflake is phasing out single-factor password sign-ins. Key-pair authentication is more secure and future-proof. See their security MFA rollout and key pair authdocumentation. - Upload your private key file (.p8 format).
- Optionally, enter the passphrase if your key pair includes one.
-
Username & Password
Enter your Snowflake username and password.
- Set the Snowflake Role (Optional)
You may override the default role assigned to this service account.
Enable Snowflake Writeback
If your goal is to use Domo to write data back to Snowflake—for example, as a Magic ETL output—then enabling writeback is the right step. This configuration allows Domo to create and update tables in your Snowflake instance using the associated Snowflake service account.- Specify the Snowflake Database
Choose the default database where Domo will write data. - Specify the Snowflake Schema
Define the default schema for data output. If it doesn’t exist, Domo will create it when selected in Magic ETL.
- Enter the Default Role
Provide the name of the Snowflake role assigned to the service account.
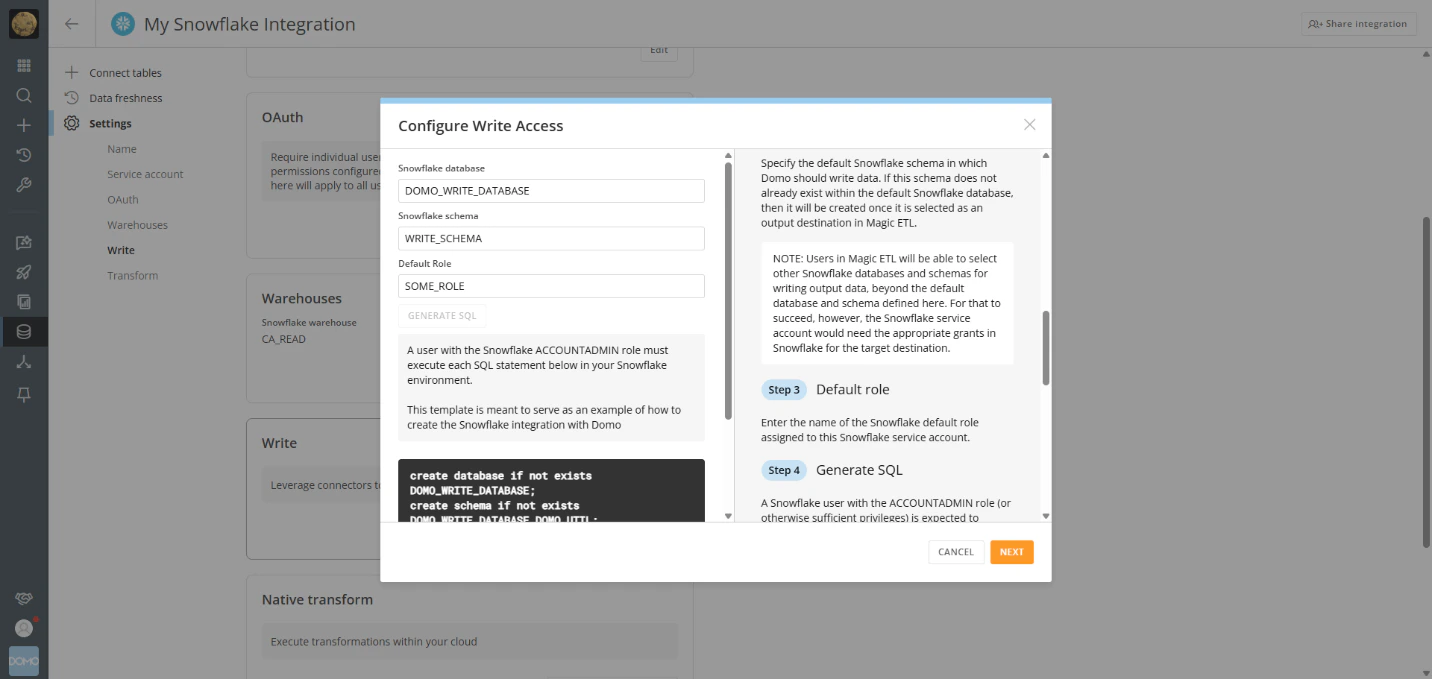
- Generate and Execute SQL
A Snowflake user with the ACCOUNTADMIN role should run the generated SQL to:
-
- Create the write-back database
- Grant access to the service account
- Create a DOMO_UTIL schema for Domo-managed resources (e.g., fiscal calendar)
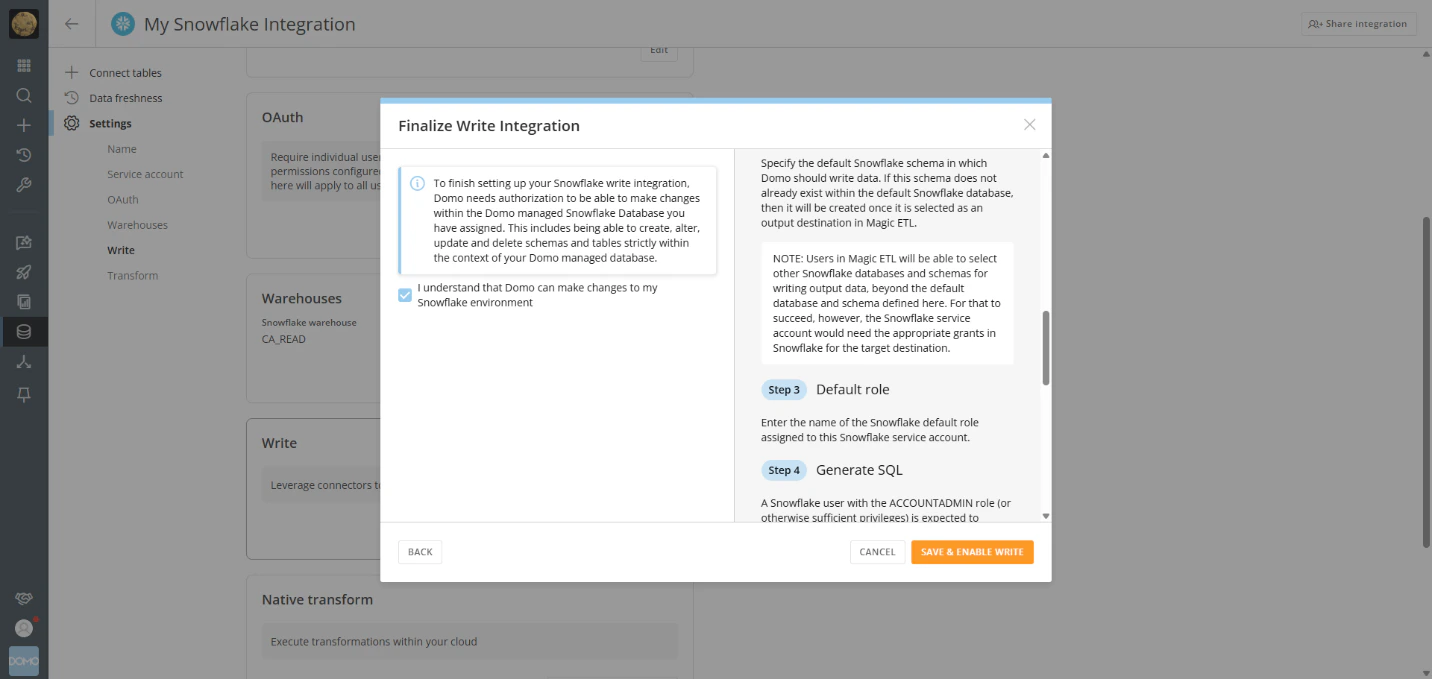
- Confirm Authorization
Finalize the setup by confirming that Domo is authorized to create, alter, and delete objects in Snowflake using the service account.
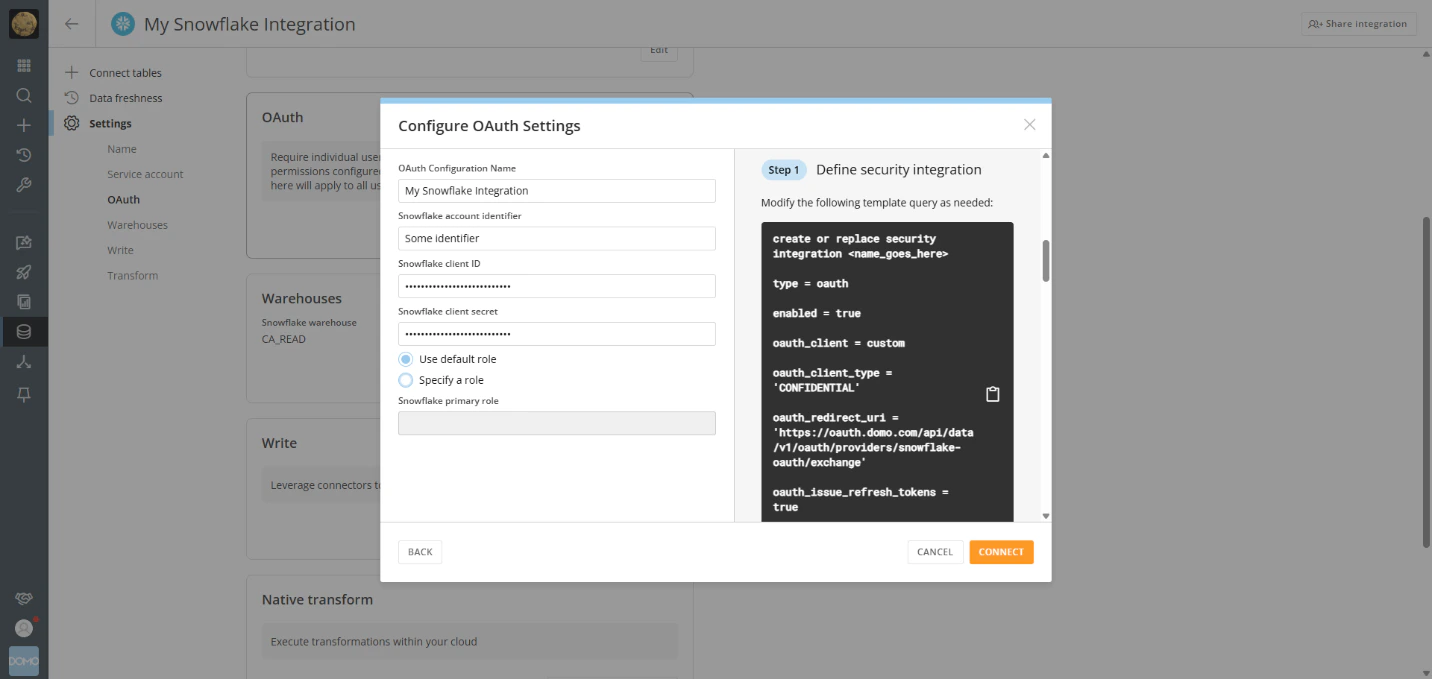
Configure OAuth
OAuth allows Domo to query Snowflake data in the context of individual users rather than a shared service account. When enabled, users accessing cards or previewing DataSets connected via OAuth will be prompted to authenticate with their Snowflake credentials.-
Define the Security Integration Modify and run the following query in Snowflake:
create or replace security integration <name_goes_here>
type = oauth
enabled = true
oauth_client = custom
oauth_client_type = 'CONFIDENTIAL'
oauth_redirect_uri = 'https://oauth.domo.com/api/data/v1/oauth/providers/snowflake-oauth/exchange'
oauth_issue_refresh_tokens = true
oauth_refresh_token_validity = 86400; -
Set Integration Name Replace
<name_goes_here>with a meaningful name. This name is used in subsequent queries. -
Set Token Duration Choose how long refresh tokens remain valid:
- 1 day = 86400 seconds
- Max = 7776000 seconds (90 days)
- Min = 3600 seconds (1 hour)
-
Verify Integration Run:
desc security integration <name_goes_here>; -
Retrieve Client ID and Secret Run:
select system$show_oauth_client_secrets('<name_goes_here>'); - Copy Values Save the client ID and secret for use in Domo.
- Enter Snowflake Account Identifier Typically a subdomain of snowflakecomputing.com. You can find it under Account > View Account Details in Snowflake.
- Enter Client ID and Secret Paste the values retrieved in Step 6.
- Set Primary Role Choose the Snowflake role to apply to all Domo users.
- Connect Select “Connect” and sign in using your Snowflake credentials.
- Allow Access Review the requested permissions and click “Allow” to complete the setup.
Troubleshoot
If you experience a problem with your Cloud Amplifier/Snowflake integration, the following information may help resolve the issue. You can also submit a request to Domo Support- Log in to Snowflake with the service account credentials.
- Ensure you can view the default Snowflake Database and query the tables you expect to import.
FAQ
DataSet Views**— DataSet Views provide the Views Explorer tool to create data transformations on your Snowflake DataSets. You can perform operations such as filtering, grouping/aggregation, JOINs, UNIONs, and creating calculated columns from a graphic user interface. DataSet Views are created as virtual DataSets, with queries sent back to the parent DataSets.
<Note>**Note:** Creating a DataSet View in Domo does not create a View (normal or materialized) in Snowflake. The View definition is stored in Domo, and the resulting query is sent to Snowflake table(s) when needed.</Note>
2. **Magic ETL DataFlows**— Magic ETL is supported with Domo running on Snowflake Cloud Data Warehouse (CDW). Using Magic ETL with Snowflake data results in data being exported from Snowflake to Magic ETL in a transient state, processed, and written back to Snowflake. Note that Domo only operates on this data in a transient fashion and does not store DataFlow outputs in Domo. (They are sent to the Snowflake warehouse.)
<Note>**Note:** Data is cached in the Magic ETL execution environment for seven days, or the two most recent data versions from that Magic ETL execution.</Note>
**What is the difference between Domo-managed and customer-managed Snowflake DataSets?
DataSet Views**— DataSet Views provide the Views Explorer tool to create data transformations on your Snowflake DataSets. You can perform operations such as filtering, grouping/aggregation, JOINs, UNIONs, and creating calculated columns from a graphic user interface. DataSet Views are created as virtual DataSets, with queries sent back to the parent DataSets. <Note>**Note:** Creating a DataSet View in Domo does not create a View (normal or materialized) in Snowflake. The View definition is stored in Domo, and the resulting query is sent to Snowflake table(s) when needed.</Note> 2. **Magic ETL DataFlows**— Magic ETL is supported with Domo running on Snowflake Cloud Data Warehouse (CDW). Using Magic ETL with Snowflake data results in data being exported from Snowflake to Magic ETL in a transient state, processed, and written back to Snowflake. Note that Domo only operates on this data in a transient fashion and does not store DataFlow outputs in Domo. (They are sent to the Snowflake warehouse.) <Note>**Note:** Data is cached in the Magic ETL execution environment for seven days, or the two most recent data versions from that Magic ETL execution.</Note> **What is the difference between Domo-managed and customer-managed Snowflake DataSets?
- Leaving data in Snowflake— Perhaps the biggest difference is that all Snowflake connectors import/duplicate data from Snowflake to Domo, while Cloud Amplifier leaves the data in Snowflake.
- Bulk create— Cloud Amplifier allows you to look up and bulk select up multiple tables to immediately create multiple unique DataSets. To do this with connectors, you would have to configure each DataSet individually with a connector.